Showing posts with label tutorial. Show all posts

Tuesday, March 6, 2012

4 Generations

I am excited to share that this post I created for Quick Quotes is being featured at FaveCrafts Blog! You can find it HERE!

There are two things I like most about being part of the Quick Quotes Design Team... the PowderPuff Chalking Inks and the Chipboard! Both are amazing products and today, I am going to show you how to use them on your layouts.


It isn't often we are blessed enough to get a photo that spans 4 generations with 90 years difference from the youngest to the oldest and I wanted a special layout for this memory. The Quick Quotes Chipboard Clock was the perfect embellishment for my layout. Let me show you how I did it...

Step One: I started by deciding on the basic design of my layout. Once that was decided, I pulled the chipboard from it's packaging and was ready to go to work.


Step Two: I knew exactly where I was going to place the chipboard piece and I also knew that there would be a piece that was hidden behind a photo. I decided to cut that part out so that I could save it to use on a future project. (This chipboard is so great you won't want to waste any of it!)


Step Three: I placed a plain piece of scrap paper uner the chipboard I was working with. I then inked the chipboard with watermark ink. This ink doesn't have any color. It's job is to hold the embossing powder.


Step Four: Once you have completely covered the chipboard with the watermark ink, remove the first piece of scrap paper and replace it with a new piece. (The first piece will mostly likely have ink on it from the last step.) Sprinkle the embossing powder over the chipboard making sure to cover all of it. The embossing powder is going to stick to the ink. Shake off any excess embossing powder onto your piece of scrap paper. Remove this paper from your work area. The extra powder can be placed back into the container to be used later. 

Step Five: You need to heat the powder so that it begins to melt. (You will want to use a special heating tool for this. A household blow dryer will not get hot enough.) You will be able to see the embossing powder melt. Be sure to move the heat source around. If you leave it in one spot too long, you can "over cook" it. I also recommend that you protect your work surface when doing this step. If not, you could cause damage from the heat.

Step Six: I didn't want a really smooth, even surface so while parts of the embossed area was still hot, I sprinkled on a little more embossing powder in a few random places and heated it again. As you can see in this photo, there are places where the embossed part is thicker than in other places. Just the look I was going for!

Step Seven: To complete the distressed look, I pulled out my PowderPuff Chalking Ink in Mocha Mama to ink around various places of the clock.

Here is the completed clock on my layout. As you can see, I also embossed the clock hands and attached them with a brad. The clock hands make a nice "photo corner" for my photo.


And finally, one more close up of the clock. This picture shows you the areas that were embossed a little more and the ones that were distressed with the chalking inks. The combination of the two makes for a beautiful, aged embellishment!

Quick Quote Supplies Used:

Other Supplies Used:
Rub-Ons: American Crafts
Flowers, Flourishes: Prima
Gems: Creative Charms
Crackle Accents: Ranger
Embossing Powder: Hampton Arts
Metal: Making Memories
Other: Cardstock, brad, tulle, lace,

Saturday, March 3, 2012

Memories

Happy Saturday! I am back with another Tin Type project! The last time I posted at Quick Quotes, I showed you how to make a girly layout out of the Tin Type Line. This time, I decided to make a page for my son's scrapbook so this one is definitely more masculine!


These pictures were taken during a stop on our Spring Break Cruise in 2010 to San Juan Puerto Rico. The walls, windows and doorways of this old fort made the perfect background for photos. The Tin Type Paper Collection had the perfect colors to complement the photos!


I love this bird! It is part of the Bag O' Chips Birds collection. I colored him by using PowderPuff Chalking Inks. I started by inking the belly of the bird with Lemonade. I then inked the rest of the bird with Blue Moon. I added some fabric accents to perch him on!


I made this banner with white muslin that I inked with PowderPuff Chalking Ink in Mango Mai Tai. After the banner was assembled, I added a little Mocha Mama around the edges! I added a little denim with copper brads and my banner was complete!

Did you notice the way I matted the main photo? I layered a lot of the darker shades of Tin Type paper for this layout and I wanted something that was a lighter shade for showcasing the photo but white cardstock was too stark. Here is a little trick that I sometimes like to use!

I started by ripping a page out of a really old book. (It really doesn't matter what it says because you won't be able to read it when you are done!) I also picked out 2 coordinating colors of PowderPuff Ink Chalks.

Starting with the lighter color (I used Green with Envy) lightly ink around the edges of the page. There is no need to ink the center of the page since it will be hidden behind the photo.

Next I took the darker shade (Blue Moon) and inked the very edge of the paper applying a little more on the corners.

Once I was done inking the page, I lightly misted it with water.


 I then carefully scrunched the corners and edges of the paper. During this process, your colors will start to blend together and have a much softer look. The paper will tear easily when it is wet so handle with care!

Once you have it all wrinkled up just the way you like it, it is time to flatten the paper out. This is also a great time to add a few tears and distressing marks along the edges to really give it that aged and distressed look. Allow to dry completely before adhering it to your layout.

This is the same technique I used to make the flowers on this layout. You can find the entire post Here!

I hope you enjoyed my tips! Have a great weekend!

Barb :) 

Quick Quotes Products Used:
Tin Type - 100, 200, 300, 400
Quote - Tin Type 500
Chipboard - Bag O' Chips Birds

Other Supplies Used:
Denim
Muslin
Brads
Page of book


Sunday, January 22, 2012

Fringe Flower Tutorial!

Hello everyone! It's my turn to share a tutorial at Frosted Designs so I thought I would share it here too! I am going to show you how to make these darling Fringe Flowers!


Sometimes when I am creating a card or scrapbook layout, I want a big embellishment but can't find what I need in my stash of supplies and do not want to spend a long time making something! These flowers are quick and easy and look great!


Step 1: Start by gathering your supplies. You will need either a paper bag or crepe paper for the base and then you can use other flowers, brads and any other item you like for the center of the flower. You will also need a 1.5 inch circle piece of cardstock in a coordinating color.


Step 2: Measure a piece of crepe paper that is 12 inches long.


Step 3: Fold the crepe in half so you have one long skinny piece.


Step 4: On the folded side, start cutting from the bottom up. Be sure you don't cut it all the way. You want to leave about 1/4 inch uncut.


Step 5: I used a circle punch to cut a circle from a piece of cardstock for my base. If you don't have a circle punch, you can just cut out a circle. It doesn't need to be perfect because no one will see it. Cover the circle with glue. Any glue will work since crepe paper sticks pretty easily to any surface.


Step 6: Take your fringed piece of crepe paper and start to glue it down to the circle starting with the outside edges and working your way in.


Step 7: This is what it should look like once you have glued down all the crepe paper in a spiral manner.


Step 8: Add a flower and a brad to the center to complete!


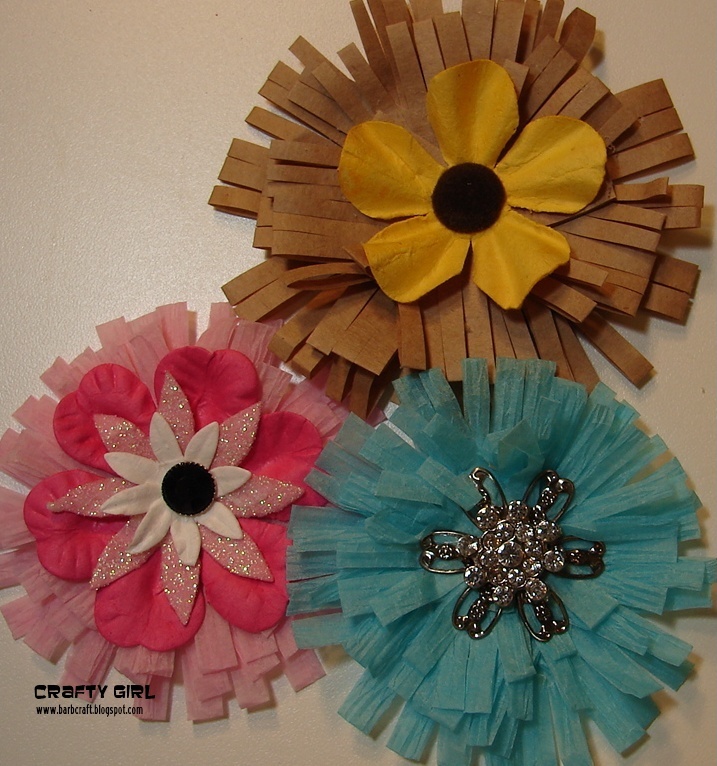
Here are a few flowers that are complete. Notice how much dimension they give without making your page heavy and bulky.


Here is a flower made from a brown paper bag that I used in a layout. I was trying to keep this layout from being too girly since it is about my husband and daughter.


Here is a close-up of the flower on the layout.


I used the sketch from this months Stack-A-Holic Template challenge at DCWV!
The papers are all DCWV Garden Party stack!

I hope you enjoy making these flowers as much as I do!
You can find more tutorials and a lot of inspiration at Frosted Designs! And did I mention that we are having a Design Team call?! Be sure to check out all the details HERE!

Tuesday, March 1, 2011

Flowering Can Tutorial

With Spring around the corner, and the weather warming up, I have been thinking about everything spring! And it has inspired me to make this darling little water can!

If this doesn't make you want to get out in the yard and plant some flowers I don't know what will! Here are the directions so you can make one, or two of your own!

Let's start by collecting our supplies:

Supply List:
Glue Glider Pro with Perma Tac
Patterned Paper: Die Cuts With a View
Flowers: Prima, Memory Makers, Imaginisce
Ribbon: American Crafts
Punch: Martha Stewart
Crystal/Pearl Flourish: Prima
Brads: Memory Makers
Other: Watering Can Pattern


1. Print the pattern out on cardstock.
2. Cut out the pattern.

3. Trace the pattern on the back side of your patterned paper.
4. Cut out the pattern.

5. Use a Score board to make the folds for the tabs and the bottom of the watering can.

6. Apply adhesive to each of the tabs on the side of the paper with the pattern.

7. Adhere the tabs to the inside of the front and back sections of the watering can.

8. Add a little adhesive to the tabs that are sticking out and tuck them in to the sides of the watering can.

9. Glue the "spout" together by placing adhesive between the two ends. Adhere the spout to the front of the watering can.

10. Use brads to hold the handles of the watering can in place.

11. Fold the handle 1.25" from each end. Put adhesive on the two folded tabs on the patterned paper side of the paper. 
12. Adhere handle to the watering can as shown.

13. This is what the finished watering can will look like.

14. Decorate the watering can with your favorite embellishments.

By changing the paper and the types of embellishments you use, you can create a completely different look. Here is an example of a watering can made for spring along with a watering can made for fall.

If you would like the pattern for the watering can, send me an email at barb.craft@att.net and I will send it to you! Have a great week and thank you for stopping by!
barb  :)

Thursday, February 10, 2011

A Valentine's Bouquet!

Today is my day to do a tutorial on She's a Sassy Lady.

I decided to show you a project me and my darling daughter created for her teacher this year for Valentine's Day! A flower sucker bouquet! This project cost me a total of $4 to make + supplies I already had. (Red pail $1, Suckers $2.99) The best part about this project is that me and my daughter (8 years old) could make it together! I really wish I could show it to all of you in real life because it is so much cuter than the photo shows!


Now for the directions.....

You will need a metal pail, cardstock both plain and printed, ribbon, suckers, styrofoam, and adhesives.


I used my Gypsy with my Bloom cartridge and cut the flowers anywhere from 2.5 in. to 4.0 inches.


I had more flowers than what I needed for this project but my daughter is using the ones we didn't use on this on her class Valentines!


We picked out 3 - 4 different sizes and colors for each flower. Using a skewer, we were able to roll the leaves back.


Once the leaves are curled back, layer them one on top of another from smallest to largest. We just used plain old glue to hold the layers together. This is also a good time to tie ribbon around the sucker.


We used a glue dot to hold the flower onto the back of the sucker.


I dug through my stash of supplies and found this block of styrofoam to place in the bottom of the pail to hold the "flowers" in place.


We added a punched border to the inside of the pail to help hold in the "grass" (shredded paper). We also added some extra trim I had laying around to dress up the pail. (Sorry for the blurry picture here!)


Here are what the flowers looked like before we added them to the pail.


And this is what the bouquet looked like when it was finished! I thought my daughter did a fairly good job of layering the flowers by height... not an easy task with the styrofoam!


We finished it off with a tag that she can write a personal little note to her teacher on!


And there you have it.... an inexpensive gift that my daughter feels good about giving because she had an active role in creating it! If you have not checked out She's a Sassy Lady yet you really need to. Sassy has a different designer each day sharing a new tutorial. I have learned so many new tricks and gotten so many ideas from her team! What are you waiting for? Go check it out!
Barb  :)
 
Blog Template by Delicious Design Studio