Thank you Sheila for sharing your blog with me!! Recently, I was working on a LO of my daughter when she walked into the room. She was so impressed with the flower (remember - she is only 8! It doesn't take much!!) she immediately wanted to learn how to do it!! Well... that got me thinking... If she wanted to learn, maybe others did too! All of the papers are from American Crafts! I just love these papers!! So, let's start with the completed LO!
I don't mean to brag, but isn't she a cutie?!! LOL!! Now, back to the flower! These are easy peasy to make!! This is what you are going to need:
I like to use 2 patterned papers and 1 solid. You only need one size circle punch to make the flower. The bigger the circle punch, the bigger the flower!
I like to use my punch upside down so I can see exactly where I am punching!
I punched out 3 circles from each pattern.
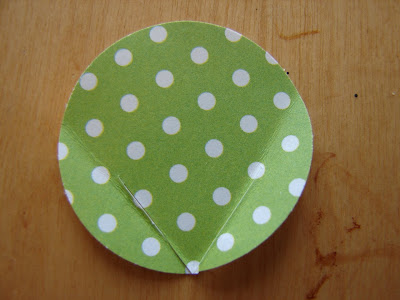
Next you need to fold in the two sides so they touch in the middle.
Do this with all six circles.
I then pick one pattern and cut on the fold half way up.
With the other pattern, I cut on the fold from the top, and go half way down. It's hard to tell in the picture!
Once I have made the cuts in all 6 circles, I lay them out in order, with the part of the circle I folded facing in.
Now it is easy to slide the ones that were cut from the bottom (green) into the ones that were cut from the top (stripes).
Continue until you have all 6 circles connected.
To hold it all together, I lift up a part of the overlapped circle and place a small drop of glue on the paper. (If you look really hard, you can see the glue on the flap that is lifted up!!)
Once they are all glued together, I add a button to the center using a glue dot. Now, once I layed this flower on my LO, it kind of got lost in the other patterns, so I had to come up with a way to seperate it from the other papers.
So... I cut out 6 circles from the solid cardstock using the same punch as the patterned papers.
I placed some adhesive on the back.....
and worked my way around the flower, letting a little of the red stick out behind each circle!
This is what the finished circle looks like!!
I also made a smaller flower out of circles. (I used a smaller punch to get these.) I cut out 5 patterned paper circles and one solid circle.
Then I just started laying them down in a circle, overlapping each circle as I went.
I added glue to the back of the solid circle and placed it on top... this is what holds the flower together. If you wanted to, you could glue each circle together as you put them together, but it really is not necessary!
Add a button with a glue dot and you are finished!!
And here it is again on the final LO! Thank you so much for taking the time to look through ALL of these pictures... I know there were quite a few! I would love to hear any comments that you have!!
barb :)


13 comments:
She's gorgeous Barb! (But you already knew that ;)) Love your flower tutorial. It looks so cool!
These flowers are soooo cute! Love your page and your colors. Everything is gorgeous!!!!!! Happy Thursday!
What a cutie she is...and she likes to craft with you..that must just make your day! LOve the flower tutorial you did a great job and I will too now have to make a few of these cute flowers for some pages coming up. Thanks
Your flowers are so great! I love that you can use any pattern paper! Great lay-out, such a cutie!
OK, first of all, this is an incredible LO. So bright and cheery without adding "too much." I just love the flower! I thought it was a traditional dahlia fold, but what a great idea! I can't wait to start making these flowers!!
Love your layout and the flowers are perfect. Great tutorial. Thanks for sharing.
Barb I love that LO & the tutorial!! TFS I am going to try this one.
I am so loving this layout! Your tutorial on the flowers is fab!!!! I love all the detail in this post. Super job, friend!
Blessings,
Kim xXx
OHMGosh Those FLOWERS are just too cute. I love that photo she is so pretty Barb. Beautiful LO. Congrats on the GD.
What a fun flower idea! And yes she is beautiful,
Thanks for sharing the tutorial.
I'm a flower fanatic. Love this. And that layout is soooo cute!
Well, first off, yes, Lauren is a cutie!! So nnow about that fabulous flower!! I love it!!! Thanks so much for sharing the tutorial with us... I will be adding some of these on my layouts for sure!!! Have a wonderful month/summer Barb... I don't see how you do the things you do, gf!!!! Hugs!!!!
What a beautiful photo !! love the way you designed this lo!!so very precious!! and the flower is awesome!!! great tutorial !! Thanks for sharing Barb!!
oxoox
Lidia
Post a Comment